Best Viewing Times:
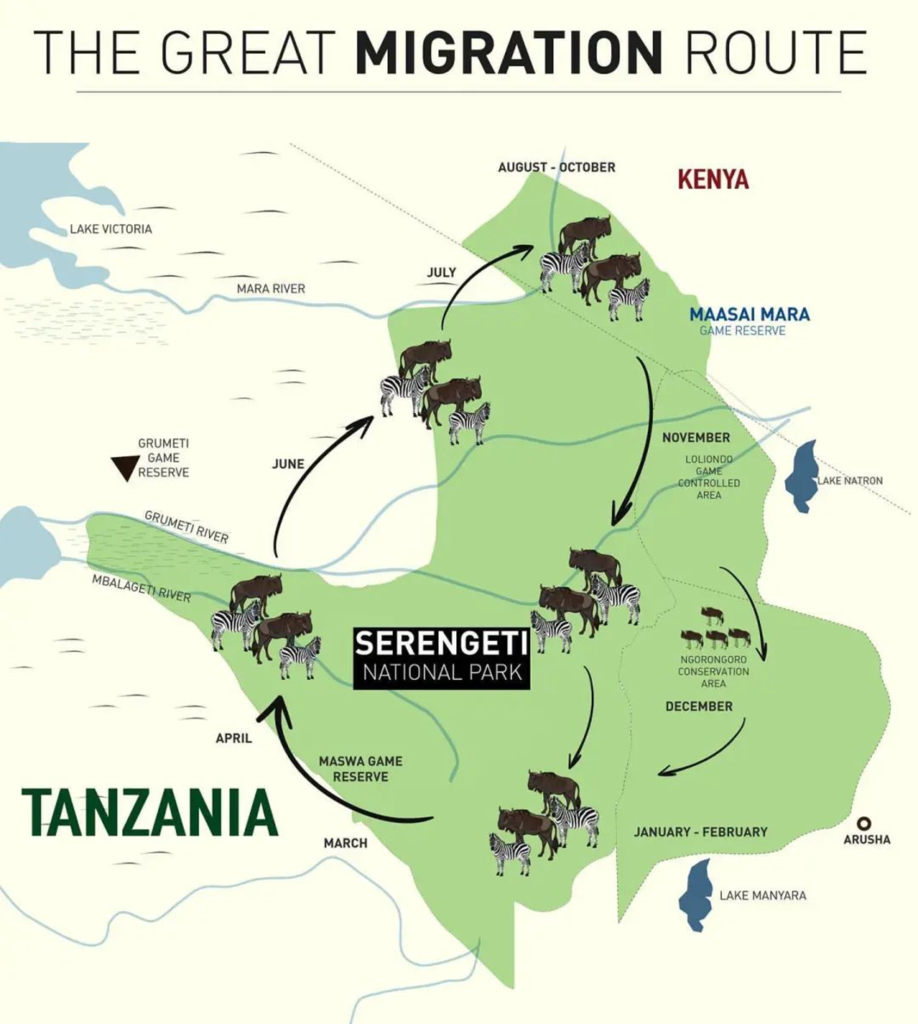
The East African animal migration occurs annually from late June to mid-October, with the peak period generally from mid-July to mid-August. July to August: This is the peak period of the animal migration in Kenya, with millions of wildebeest and zebras pouring into the Maasai Mara Reserve, crossing rivers and grasslands, making it an excellent time to observe the migration. October: In early October, animal groups begin to leave the Maasai Mara Reserve and return to the Serengeti National Park in Tanzania. During this period, you can see a large number of migrating animals crossing rivers.
Note: Animal migration actually occurs in a continuous cycle throughout the year, so any season is suitable for visiting Africa. However, different seasons offer different views of animals and landscapes. Here are some recommended time periods for better value:
✅ March-April: Calving Season – Miniature Wildebeest During this time, the wildebeest herds will stop and give birth in the short grass plains of the southeastern Serengeti, with over 500,000 wildebeest calves being born. There’s a great opportunity to witness carnivores hunting. Coinciding with the spring festival, it’s an absolute delight to visit the Serengeti with your family! ❗ Focus on: Southern Ndutu area ⚠️ Note: The Ndutu area mainly consists of movable tented camps.
✅ Late May: Off-peak Season – Ngorongoro Crater Just in time for a short holiday, it’s a good time to visit Tanzania, avoiding the traditional peak season. Passing through the Grumeti River, Ngorongoro is unusually beautiful and a well-kept secret for travelers. With fewer people, you can enjoy the vast grassland, witness sunrise and sunset, and even enjoy luxury hotels at half price. ❗ Focus on: Ngorongoro Crater and the endless sea of flowers ⚠️ Note: The crater rim has a high altitude, so bring lightweight down jackets.
✅ July-August: Migration Season – Crossing the River (Crowded) This is the climax of the animal migration, with thousands of wildebeest crossing the river. Experienced guides also seize the opportunity to secure prime viewing spots. This is the peak tourist season, so naturally, costs are higher, especially for popular hotels, which often need to be booked six months to a year in advance. ❗ Focus on: Northern Serengeti/Mara River area ⚠️ Note: Peak season means more people; poor road conditions; and a lot of dust.
✅ October: Migration Off-peak Season – Crossing the River (Less Crowded) The wildebeest herds return south to the Serengeti, with a higher chance of seeing them crossing the river. With fewer tourists than in July and August, there are also fewer safari vehicles, providing a better experience. ❗ Focus on: Northern Serengeti area ⚠️ Note: You can see river crossings in early October, but in the latter part of the month, it depends on luck.
Best Viewing Locations:
- Maasai Mara National Reserve: As Kenya’s most famous wildlife sanctuary, Maasai Mara National Reserve is undoubtedly the prime location for observing the animal migration. With its open terrain, vast grasslands, and diverse range of animals, it’s an excellent place for capturing wildlife and natural landscapes.
- Serengeti Plains: Although located within Tanzania, the Serengeti Plains are closely linked to the Maasai Mara Plains and serve as the starting point for the animal migration. Here, visitors can experience the migration atmosphere in advance and admire natural scenery different from that of Maasai Mara.
Migration Overview:
With millions of wildebeest, hundreds of thousands of zebras, and gazelles forming massive herds, they migrate north from the Serengeti Reserve in Tanzania to the Maasai Mara National Reserve in Kenya, covering over 3,000 kilometers. Along the way, they must traverse the ambushes of lions and leopards in the grasslands, beware of scavenging hyenas, and the crocodiles congregating on the banks of the narrow Mara River, all preparing to share in the impending feast.
Upon reaching their destination, due to climate changes, just two to three months later, this expeditionary force of over two million herbivores will once again tirelessly seek out green grass and return to the Serengeti. In this migration of millions, only 30% of the lucky ones can return to their place of departure, and along with them, there are 400,000 newborn lives born during the perilous journey.
Migration Animals:
The herds participating in the migration are divided into “front, middle, and rear armies.” Leading the charge are over 200,000 wild zebras, followed by over a million wildebeest, and trailing behind are around 500,000 gazelles. Since zebras prefer to eat tall grass, which is the food of wildebeest, and the lower grass is the delicacy of the shorter gazelles, each benefits from the other’s foraging habits. Following the herbivores, there are packs of fierce carnivores such as African lions, cheetahs, and hyenas.
Zebras: There are around 300,000 zebras, which prefer to eat tall grass, namely the tops of grass stems.
Wildebeest: Over 1.5 million wildebeest graze behind zebras, consuming the lower parts of grass nibbled by zebras.
Within the vast migration procession in Africa, wildebeest stand out as the main protagonists due to their absolute numerical advantage and are also the representative species of the Great Migration. Wildebeest, also known as gnu, are large antelopes that inhabit the African savannah. They are classified as near-threatened species. Wildebeest belong to the bovid family, subfamily Alcelaphinae, genus Connochaetes, and there are two species: the white-bearded wildebeest and the blue wildebeest. The blue wildebeest, also known as the common wildebeest, is the most familiar to us, exhibiting migratory behavior according to the seasons.
Wildebeest primarily feed on grass and young shoots. During the July to September dry season in Africa, wildebeest must migrate in search of fresh grass. During the nearly 3,000-kilometer Great Migration in Africa, there are numerous dangers, and approximately 250,000 wildebeest are estimated to die. However, despite this, wildebeest continue this endless cycle of migration between Tanzania and Kenya, gathering in large groups for long-distance trekking and river crossings.
Gazelles: Approximately 500,000 gazelles are the rearguard of the herds. After the wildebeest leave, the grasslands reveal freshly grown grass, which becomes the delicacy of the trailing gazelles.
If you’re lucky, you may also see the African elephant migration, where even young elephants, just born, must endure the harsh tests of nature. Many weak elephants that can’t keep up with the herd are destined to be eliminated by the rule of natural selection.
Or the mischievous honey badger, which is relatively common in Africa, is known as the “ballet dancer of the African savannah” and is considered one of the most amusing animals on the savannah. They are highly alert and territorial, and are very social animals, migrating multiple times a year if food becomes scarce.
In addition to the Great Migration, there are also other attractions in Tanzania such as:
- The “Eighth Wonder of the World,” the Ngorongoro Crater, which is a paradise for wildlife.
- The endless plains of the Serengeti, one of the “Top Ten Natural Wonders of the World.”
- Tarangire National Park, the “Elephant’s Paradise,” with forests of baobab trees.
- Mount Kilimanjaro, the “Roof of Africa.”
- Lake Manyara, the “World’s Most Adorable Place,” a bird paradise.


