How to Mirror Windows 10 screen to TV

Miracast, HDMI over WiFi is a WiFi standard. With Miracast, any computer can display the screen to TV. Here is how.

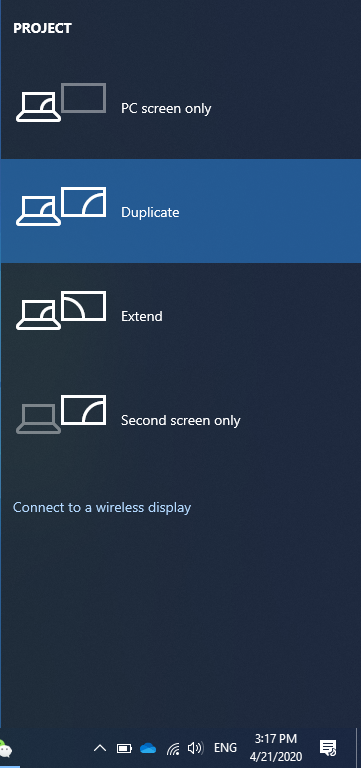
  1. In Windows 10, Press Windows key + P. If you see PROJECT options like below. You should be able to mirror the screen to TV.

2. Click Connect to a wireless display. Select the TV (Living Room in our case) to display the windows screen.

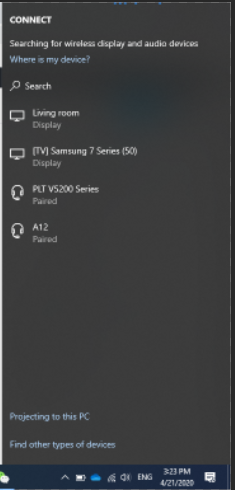
If you don’t see the TV on the list, you may need to enable it on the TV Settings. For example Roku TV, go to Settings>Screen Mirror.

How to create a backlit using Lens Flare in Photoshop

  1. With the image open, add a mask.

2. Fill with black background.

3. Create a Smart Object by right click on Black layer 1 and select convert to mart object. Note: it could be any color. Black is easy to show the backlit.

4. Now, go to Filter>Render>Lens Flare. You will have different lens type options. Pick one you like.

5. Select one of blending mode, in our case it is Hard Light.

6. Use the move tool to move the light and adjust Opacity.

7. Crop the image and save it.

How to use color range to select an object

There are many ways to select an object in Photoshop. For example,

How to use Quick Action in Photoshop to Remove Background or Select Object

Using Alpha Channel in Photoshop – Step by step with Screenshots

How to use Object Selection Tool in Photoshop 2020


In this example, we show you how to use color range to select an object.

This is before.

This is after

Here is how.

  1. With the image open, select Color Range from Select menu.

2. Use the point to select sample color. Point + to add more sample color.

3. Click OK to close the Color Range window and you have select the sample color, cloud and snow in our example.

4. Inverse the selection which select the tree.

6. Use Select and Mask in Selection Menu to deselect the area you don’t want.

7. Add a new layer and then add solid color (white in our example)

8. Move the new Color fill 1 layer below the original layer. You can check the selection.

9. Or you can move the select tree to another image.

Please view the step by step video:

How to sharp an image using High Pass Filter in Photoshop

There are many ways to sharp an image in Photoshop. High Pass filter is one of them. The different is the High Pass filter only sharpens edges, and anything that’s not an edge becomes flat grey . Therefore, we use it a lot in portrait.

  1. With the image open, duplicate the layer.

2. Open High Pass from Filter>Others.

3. Set the Radius between 1 to 2 pixel. in most cases, 4 and above is too much.

4. Select Overlay or Soft light in Blending mode.

5. If you want to have more sharp, duplicate other layer.

Please view the step by step video:

Blur portrait by using Photoshop Lens Focus with Alpha Channel

You may blur a background by selecting a background and Lens Blur filter. However, the best way to blur a background is using Alpha Channel plus Lens Blur Filter. Here is how.

  1. With the image open, create an Alpha Channel in Channel panel.

2. Still highlight Alpha 1. Click Radiant Tool to create Linear Gradient from the right to center.

3. Highlight all Channels except Alpha 1. Then go to Filter>Blur>Lens Blur. Select Alpha 1 channel. Check Inverse (because we blur starts at right eye). Adjust Radial, Blur Focus distance and more. Check and uncheck the Review to compare before and after.

4. Click OK to complete it.

Using Photoshop Surface Blur to soft skin

Surface Blur in Adobe Photoshop can denoise images, while preserving edges. We can use it to fix noisy photos or smooth out areas with a similar color.

This is before

After

With the image open, go to Filter>Blur>Surface Blur. Adjust Radius and Threshold.

Please view the step by step video:

原色(基本色)的基础知识

原色是指不能通过其他颜色的混合调配而得出的“基本色”。它们是RGB(红绿蓝)。RGB 色系也是我们常说的加色法,混合任两个原色,就会产生三个次原色:青、洋(品)红。RGB这三种颜色的组合,几乎形成了所有的颜色。将光的三原色加在一起就可以做出白光。所以,如果一个 RGB 的值为 255,255,255 则表示为白色。如果完全拿掉这三原色的光 (RGB: 0,0,0) 则产生黑色。

RGB 模式的相反模式就是 CMYK 模式也就是减色法,CMYK模式中所使用的三原色就是 RGB 模式中的次颜色。如果将红、绿、蓝光混合在一起形成白光,那么就表示将青、洋红、黄三色的颜料混合在一起就会产生黑色,因为三原色的光波都将被颜料所吸收了。

How to use Quick Action in Photoshop to Remove Background or Select Object

  1. Open the image.
Blonde girl with long and shiny wavy hair . Beautiful model with curly hairstyle .

2. Add a Mask. Make sure original image selected.

3. Click Properties and then Quick Action. Click on Remove Background. If you don’e see the Properties, go to Windows menu to check it.

4. It may take a few minutes to remove the Background.

5. Use Select and Marks to refine the edge. Move into yellow background to check the result.

How to use Match Color in Photoshop

This is the image before matching.

This is the source image will be matched from

To do that, open these two images in Photoshop. On the image you would like to match, go to Image>Adjustment>Match Color.

From Source, select the source image.

You can adjust Luminance, Color Intensity, and Fade. Clock OK to save.

Please view the step by step video: