美国天空之镜Bonneville Salt Flats导航

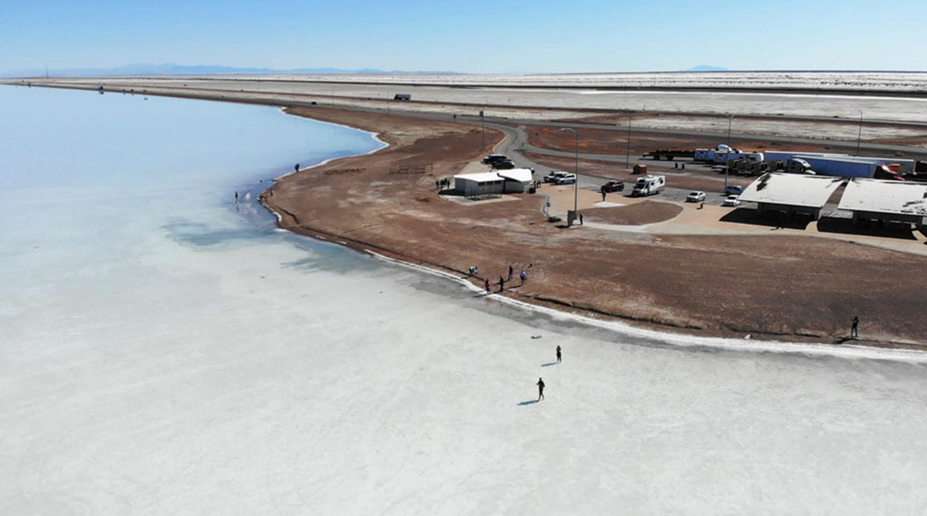
著名的美国版天空之镜Bonneville Salt Flats(博纳维尔盐滩)位于盐湖城西边,开车1.5小时,是它大盐湖 Great Salt Lake 已经干涸的部分。
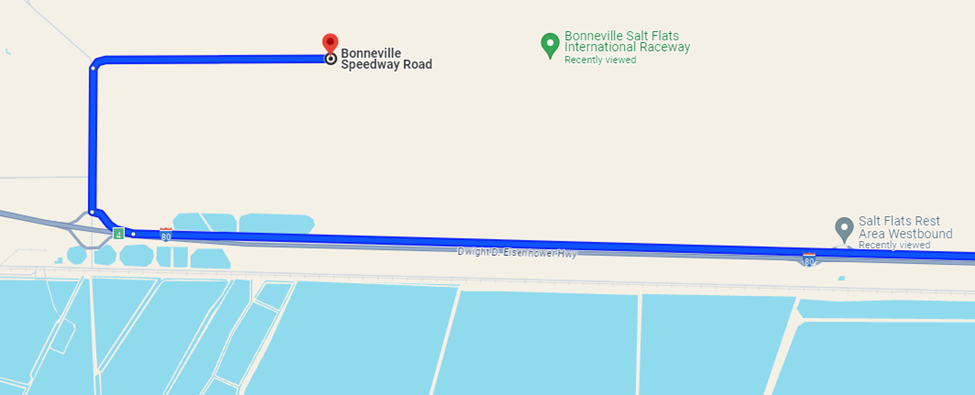
天空之镜的地址/导航

去参观 Bonneville Salt Flats ,可以把车停在两个地方。

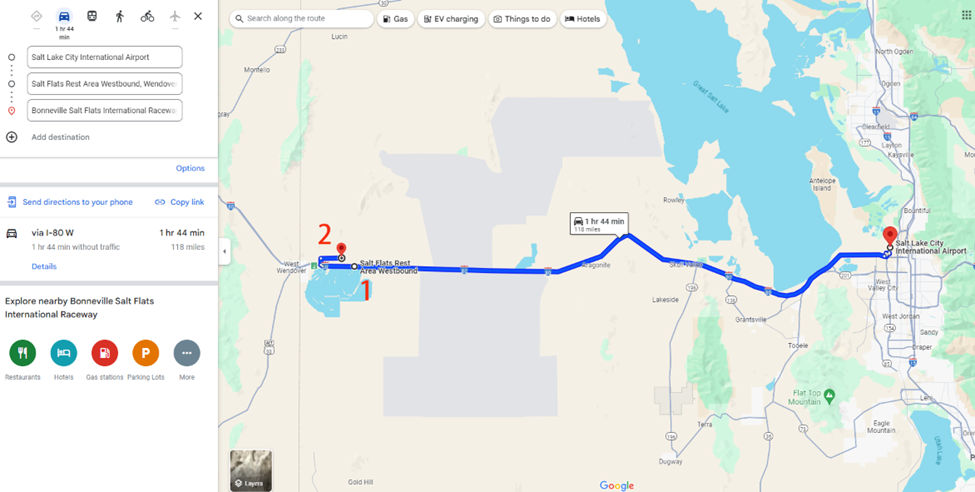
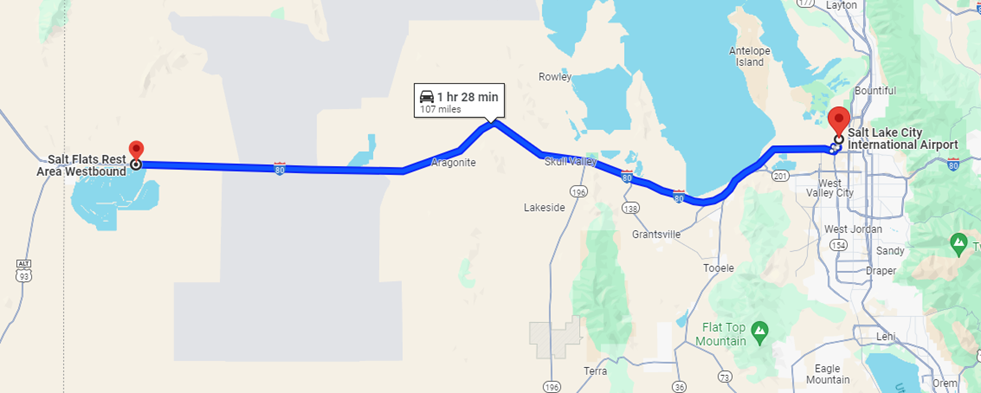
第一个停车点在 Salt Flats Rest Area Westbound(地图140°44’25.1″N 113°51’04.6″W),这里是80高速公路(西行)的休息站,有卫生间和冲洗设施,但不是很显眼,快到的时候注意减速。

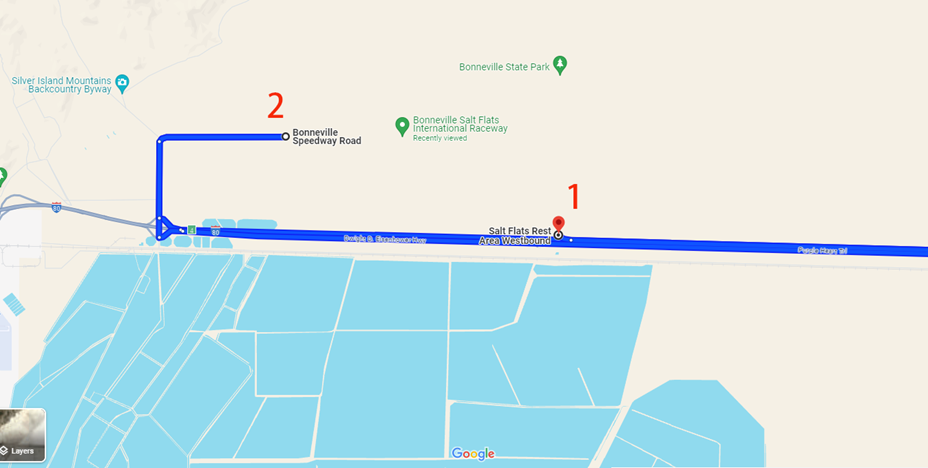
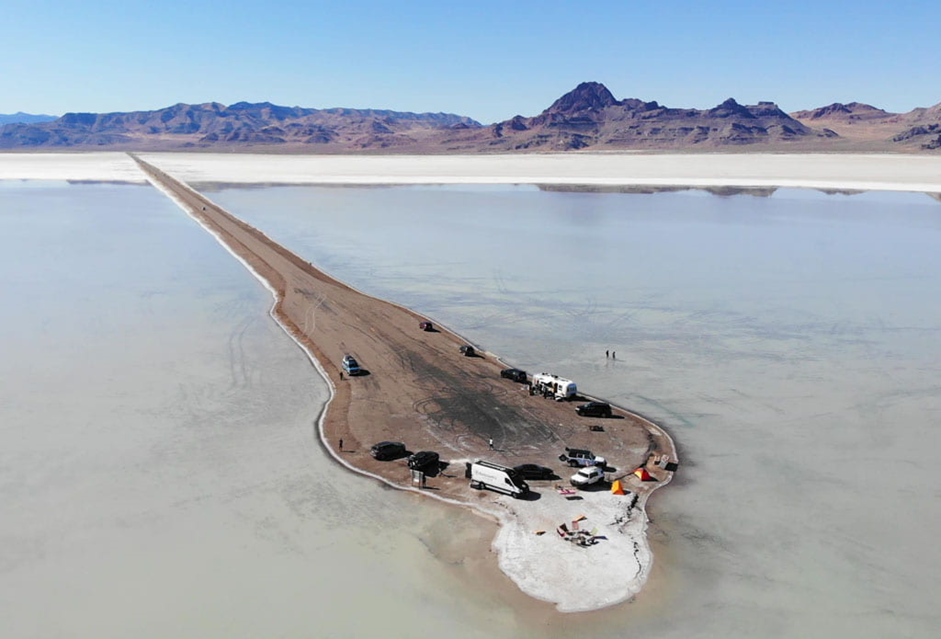
第二个地方便是 Bonneville Speedway Road (地图2, 40°45’44.7″N 113°53’45.6″W),走80公路上时,一定要在 Exit 4 转出来,然后一路向北,经过卡车停靠站,再右转,最后才能到达 Speedway,如果你错过了,下一个出口要在40英里后了.要是天气够干,盐滩够硬,可以从这里开车到盐滩深处。盐滩部分积水的时候,更像是天空之境。

注:如果觉得天空之镜太远,可以导航到Stansbury Bay,是一大块私人盐田,由几百块小盐湖组成,其中有一块粉色盐田尤其出片。

但不用跟着地图走到终点,因为这是私人领地不让进,在下图中画圈附近停下就行,距离盐湖城市区大概30分钟车程,最好带上无人机航拍。

常见问题

Q:天空之镜需要门票吗?

不需要门票,也不需要停车费,无人管理,全年免费开放

Q:车可以开进去吗?

由于是无人管理景区,要不要开车上去全看自己,但有几点需要注意:

  1. 盐是有腐蚀性的,出来以后要及时清洗,不要隔夜;如果是租车,基本上都不允许开上去,被发现会面临$200以上的罚款
  2. 冬天或者雨季盐层比较松,开上去容易陷进去,会有牌子提示
  3. 边缘盐层比较薄,最好与其保持100米以上安全距离

Q:天空之镜的最佳游玩时间?

每年11月到次年5月,景区地表通常有水,是拍反光水景(天空之镜)的最佳时间,晴天拍出的效果最好;或者前几天下雨+大晴天,也是出片的极佳组合

如果想把车开上去,来一把速度与激情,夏天前往是最好的选择

游玩建议及注意事项

1.提前看好天气预报,最好晴天前往,不然即使地表有水,镜面效果也不会很好。但晴天的中午光线太强,镜面效果也会打折扣。

2.盐地反射强烈,一定做好防晒,最好带个面罩。另外,拍照的工具人要带一个墨镜或伞,不然根本睁不开眼睛,只能盲拍。

3.冬天超级冷,而且风大,要多穿一点并戴帽子,一是为了保暖,二是可以帮女生固定头发,在风中保持发型太难了。

4.站在水里拍照最出片,但盐水挺伤鞋,建议穿耐造的鞋或拖鞋(也可以光脚,但盐粒很硌脚)。

5.可以多备几套亮色衣服,那边地广人稀,可以随时在车里换。

6.日落时分光线会变得非常柔和,把雪白的盐滩染成粉色,非常梦幻。

7.盐滩周围有加油站,但数量少价格贵,最好提前加满。

8.可以带上无人机,航拍画面更震撼。

9. 什么时候去博纳维尔盐滩最好?

夏季,6月-10月,地表是盐滩,可以在上面驾车。 冬季,11月-5月,地表可能有积水,不能驾车,但更容易拍摄出天空之镜的效果。

10. 我可以在博纳维尔盐滩上驾车吗?

只要盐滩是干燥的,就可以驾车进入,但后果自负: 盐滩边缘非常脆弱,车可能会突然陷入泥中,造成灾难性后果(因此,要在距离盐滩边缘100米外驾驶)。2. 盐会腐蚀轮胎和底牌,如果是自己的车,记得冲洗干净~ 租来的车 … 其实不让你开上这路。如果盐滩上有水,那除非对地形非常熟悉,否则禁止驶入。

Sony Camera Finder/monitor auto settings does not work

If the display does not switch properly from the LCD screen or monitor to the Electronic Viewfinder (EVF) when the FINDER/MONITOR setting is set to Auto, it could be the Eye Sensor is dirty or settings issue. Here are some resolutions.

1. Cleaning Eye Sensor:

1) Remove the Eyepiece cup.

2) Clean the Eyepiece cup and the Eye Sensor.

3) Put the Eyepiece cup back.

2. Checking the FINDER/MONITOR settings:

1) Press Menu.

2) Select Custom Settings.

3) Select FINDER/MONITOR.

4) make sure Auto is selected.

3. Drain the residual power in a Sony camera:

Turn the camera off.

Remove the battery.

Turn the camera on. (Yes, with the battery removed.)

Hold down the shutter button for 60 seconds.

Turn the camera off.

Insert the battery.

Turn the camera on.

4. Reset Settings:

1) Press Menu.

2) Select Setup.

3) Navigate to Setup subpage 7

4) Select Settings Reset.

Hope one of them fixes the problem.

The display does not automatically switch to the viewfinder.

The display does not automatically switch to the LCD

IMPORTANT: This article applies only to specific products and/or operating systems. Check Applicable Products and Categories for details.

How to upgrade Firmware on Sony A7R Camera

Ensure your Sony camera is updated with the latest firmware. Here’s how to check and update the firmware of your ILCE-7RM2 camera.

Step 1: Check System Software Version

  1. Turn on your camera and go to “Menu.”
  2. Navigate to “Setup subpage [6]” and select “Version.”
  3. If your version is Ver. 4.01, no update is needed.

Step 2: Verify System Requirements Ensure your computer meets these requirements:

  • Operating Systems: Windows 10 or above.
  • Power Source: Fully charged NP-FW50 battery pack or AC adaptor AC-PW20
  • USB Cable: Use the cable supplied with the camera

Step 3: Download the Updater

  1. Visit the Sony website and find the firmware update.
  2. Read the disclaimer and click “Download.”
  3. Save the file, for example Update_ILCE7RM2V401.exe to your desktop.

Step 4: Prepare for Update

  1. Close all running programs.
  2. Double-click the downloaded file [Update_ILCE7RM2V401.exe].
  3. The System Software Updater will start.
  4. Turn on your camera, go to “Menu,” “Setup subpage [4],” select “USB Connection,” and ensure “Mass Storage” is selected.
  5. Connect the camera to the computer with the supplied USB cable.

Step 5: Execute the Update

  1. Follow on-screen instructions on the System Software Updater.
  2. Click “Next” to proceed if the current version is Ver. 4.00 or earlier.
  3. The camera will automatically reset, and the update process will start. This will take approximately 5 minutes.

Important Notes:

  • Do not turn off the camera or disconnect the USB cable during the update.
  • If the computer doesn’t recognize the camera, reconnect the USB cable or try another USB terminal.
  • After updating, the camera will restart automatically.

Step 6: Confirm Update

  1. Once the update is complete, the device will restart.
  2. On the camera, go to “Menu,” “Setup subpage [6],” and select “Version” to confirm it displays Ver. 4.01.

Troubleshooting:

  • If the update doesn’t complete and the monitor remains black for over 15 minutes:
    • Disconnect the USB cable and remove the battery and AC adapter.
    • Wait a few minutes, then reinsert the battery or reconnect the AC adapter.
    • Restart the computer and repeat the installation process.

Following these steps ensures your Sony ILCE-7RM2 camera is updated to the latest firmware version, enhancing its performance and features.

Bad experience with Muller Honda

We received the recall notice in January 2024. I called Muller Honda. They told me that they didn’t have the part and would let me know when it became available. I received a second recall letter in March and called them again, but got the same response. I waited for over half a year without receiving any call from Muller Honda, so I called them again today. I was told they still don’t have the part. The problem is they never called me back regarding the part.

A 5-day trip to Salt Lake City and nearby attractions:

Day 1: Arrival in Salt Lake City

  • Morning/Afternoon: Arrival
    • Arrive in Salt Lake City and check into your hotel.
    • Rest and refresh after your journey.
  • Evening: Explore Downtown Salt Lake City
    • Visit Temple Square.
    • Explore the Utah State Capitol.
    • Dinner at a local restaurant.

Day 2: Great Salt Lake and Antelope Island

  • Morning: Great Salt Lake
    • Head to the Great Salt Lake Marina.
    • Enjoy the unique experience of floating in the lake.
  • Afternoon: Antelope Island
    • Drive to Antelope Island State Park.
    • Hike or bike the island trails.
    • Watch for bison and other wildlife.
    • Picnic lunch on the island.
  • Evening: Return to Salt Lake City
    • Relax and have dinner in the city.

Day 3: Day Trip to Arches National Park

  • Early Morning: Drive to Arches National Park
    • Start early (around 5-6 AM) for the 3.5 to 4-hour drive to Arches National Park.
  • Late Morning/Afternoon: Explore Arches National Park
    • Visit iconic landmarks such as Delicate Arch, Landscape Arch, and Double Arch.
    • Take short hikes and enjoy the stunning rock formations.
  • Evening: Stay in Moab
    • Check into a hotel in Moab.
    • Dinner in Moab.

Day 4: Explore Moab and Return to Salt Lake City

  • Morning: Moab Adventures
    • Optional: Early morning hot air balloon ride over Moab.
    • Visit Dead Horse Point State Park for amazing views of the Colorado River.
  • Afternoon: Drive back to Salt Lake City
    • Head back to Salt Lake City (3.5 to 4-hour drive).
  • Evening: Relax in Salt Lake City
    • Dinner and unwind after the drive.

Day 5: Departure or Additional Exploration

  • Morning: Optional Activities in Salt Lake City
    • Visit the Natural History Museum of Utah.
    • Explore Red Butte Garden.
  • Afternoon: Departure
    • Head to the airport for your flight home.

Additional Tips:

  • Car Rental: Renting a car is highly recommended for flexibility and ease of travel.
  • Accommodation: Book accommodations in Salt Lake City and Moab in advance.
  • Park Passes: Purchase a National Park pass if you plan to visit multiple parks.
  • Weather: Check the weather forecast and pack accordingly.

Step by step guide for updating Sony A1 firmware from version 1.10 to V 2.02.

To update your Sony A1 firmware from version 1.32 or earlier, you must follow a specific update order first to version 1.35.

Then to version 2.01 and finally to version 2.02.

Skipping any steps or attempting to update directly to version 2.02 will cause an error.

First, let’s check your current firmware version.

Turn on your camera and select Menu, then navigate to Setup, Setup option and finally Version.

The system software version will be displayed on the screen if the date time setting screen appears when you turn on your camera.

Be sure to set the date and time correctly before proceeding with the update.

Using the Imaging Edge mobile app, Please note that updated cameras cannot connect to this app.

You’ll need to install the Creators app after updating your camera.

Ensure your Imaging Edge mobile app is version 7.7.2 or later to pair with the Creators app.

If you’re using an iPhone or iPad, restart your device after the camera update and then pair it with the Creators app.

Update the Imaging Edge Mobile app to the latest version before pairing with the Creators app.

Follow the guide provided for migrating from the Imaging Edge Mobile app to the Creators app for detailed instructions.

Now check if your firmware version is later than 2.00.

If your firmware version is 1.32 or earlier, you need to update to version 2.01 via version 1.35 first and then to version 2.02.

Links to the update pages for Windows and Mac are in the description below.

Now let’s go through the step-by-step process to update your Sony A1 firmware.

Step one, visit the Sony Support website.

Step 2, Download the appropriate firmware updates.

Make sure to download version 1.35 first, followed by version 2.01 and finally version 2.02.

Step 3 Prepare your camera and computer.

Ensure your camera battery is fully charged or connected to an A/C adapter.

Connect your camera to your computer using a USB cable.

Step 4 Run the firmware update file.

Locate the downloaded firmware update file for version 1.35 on your computer and run it.

Follow the on-screen instructions carefully.

Step 5 Repeat the update process for version 2.01 and then version 2.02 after each update.

Check the firmware version on your camera to ensure the update was successful.

And that’s it.

By following these steps, you’ll ensure a smooth and successful firmware update for your Sony A1.

Remember to check your firmware version after each update stage.

Mastering the Basics Essential Sony A1 Camera Operations Guide

Whether you’re a beginner or looking to refresh your skills, this guide will help you get the most out of your Sony A1.

The FN button is your quick access to essential settings.

Press it to bring up a customizable menu on the LCD screen where you can easily adjust key functions like ISO, white balance, and drive mode.

The control wheel allows you to navigate through menus and settings.

Rotate it to scroll through options or press it to make selections.

It’s perfect for quick adjustments on the go.

The multi selector gives you precise control over your focus points.

Move it in any direction to select your focus area, making it easier to capture the perfect shot.

The mode dial lets you switch between different shooting modes such as manual, aperture priority, shutter priority, and more.

Just rotate the dial to select the mode that suits your shooting scenario.

The Menu button opens the main menu where you can access all of the camera settings and customization options.

Use it to fine tune your camera setup to your liking.

The Sony A1 features several customizable buttons labeled C1C2C3 and C4.

Assign your most used functions to these buttons for quick and easy access during shooting.

The shutter button is your gateway to capturing photos.

Press it halfway to focus and fully to take the shot.

It’s responsive and ensures you never miss a moment.

The rear and front dials let you adjust settings like aperture, shutter speed, and more.

Rotate them to make quick changes without taking your eye off the viewfinder.

The AEL button locks the exposure, ensuring consistent lighting across your shots.

This is particularly useful in challenging lighting conditions. Please refer to this example before and after using AEL.

The AF-ON button on the Sony A1 camera is used to activate autofocus independently of the shutter button. This feature is often referred to as back-button focusing and provides several advantages. You can lock focus on a subject and recompose your shot without worrying about the camera refocusing when you press the shutter button.

The disp button cycles through different display modes on the LCD screen and viewfinder.

Giving you a clear view of your settings and composition.

The delete button allows you to quickly remove unwanted images from your memory card.

Just press it and confirm to free up space for more shots.

The Sony A1’s touch screen lets you focus, select settings, and navigate menus with just a tap.

It’s intuitive and makes shooting more efficient.

And that’s a wrap on the basic operations of the Sony A1.

We hope this guide helps you get started with your camera.

Fixing DJI Mini 3 issues related to the accuracy or reliability of the return-to-home feature

If you’ve ever had trouble with the return to home feature on your DJI Mini 3, you’re not alone.
Whether it’s accuracy problems or reliability issues, we’ve got some tips to help you out.
First, let’s start with some pre-flight checks.
Always ensure your drone’s firmware is up to date.
This can resolve many issues right off the bat.
Open the DJI Fly app and check for any firmware updates.
If there’s an update available, follow the onscreen instructions to install it.
Next, calibrate the compass.
This helps the drone maintain accurate positioning and improves the return to home accuracy.
In the DJI Fly app, go to Settings, select Safety and then Sensors.
Follow the prompts to calibrate the compass.
Setting an accurate home point is crucial.
Make sure your drone has a strong GPS signal before takeoff.
In the DJI Fly app, tap on the map and set your current location as the home point.
Alternatively, you can set the controller’s location as the home point if you plan to move during the flight during flight.
Avoid areas with strong magnetic interference, such as metal structures or power lines, which can affect the GPS signal.

How to update DJI mini 3 firmware using the DJI Fly App

Many common issues with DJI drones, such as connectivity problems, GPS signal loss, and performance bugs, can often be resolved by updating the firmware. Updating the firmware of your DJI Mini 3 drone can be done using the DJI Fly app or DJI Assistant 2. Here’s how you can do it:

Using the DJI Fly App:

  1. Connect Your Drone and Controller:
    • Turn on your DJI Mini 3 and the remote controller.
  2. Connect your mobile device to the controller using the appropriate cable. To connect a mobile device to a DJI controller, you can use the included USB-C or Lightning cable. DJI recommends using their dedicated DJI RC-N1 RC Cable for the best experience. Open the DJI Fly App:
    • Launch the DJI Fly app on your mobile device.
  3. Check for Firmware Updates:
    • In the DJI Fly app, navigate to the home screen.
    • If a firmware update is available, you will usually see a prompt to update. If you don’t see a prompt, go to the “Profile” tab, tap on “Settings,” and then “Firmware Update” to manually check for updates.
  4. Download and Install the Update:
    • Follow the on-screen instructions to download and install the firmware update.
    • Ensure your drone and controller remain powered on during the update process.
    • Keep your mobile device connected to the internet for the download.
  5. Wait for the Update to Complete:
    • The app will download the firmware update and install it on your drone.
    • Do not turn off the drone, controller, or close the app until the update is fully completed.
  6. Restart Your Devices:
    • After the update is complete, restart both the drone and the remote controller to ensure the new firmware is applied correctly.

Using DJI Assistant 2:

  1. Download and Install DJI Assistant 2:
    • Go to the DJI official website and download the latest version of DJI Assistant 2.
    • Install the software on your computer.
  2. Connect Your Drone to the Computer:
    • Use a USB cable to connect your DJI Mini 3 to your computer.
    • Turn on the drone.
  3. Open DJI Assistant 2:
    • Launch the DJI Assistant 2 software on your computer.
  4. Log In to Your DJI Account:
    • If prompted, log in to your DJI account.
  5. Select Your Drone:
    • In the DJI Assistant 2 interface, select your DJI Mini 3 from the list of connected devices.
  6. Check for Firmware Updates:
    • Click on the “Firmware Update” option.
    • The software will check for available firmware updates.
  7. Download and Install the Update:
    • Follow the on-screen instructions to download and install the firmware update.
    • Ensure your drone remains powered on and connected to the computer during the update process.
  8. Wait for the Update to Complete:
    • The software will install the firmware update on your drone.
    • Do not disconnect the drone or turn off the computer until the update is fully completed.
  9. Restart Your Drone:
    • After the update is complete, restart your drone to ensure the new firmware is applied correctly.

By following these steps, you can ensure your DJI Mini 3 is running the latest firmware, which can provide new features, improvements, and bug fixes.

从联邦医疗保险优势计划转到传统的联邦医疗保险会有麻烦吗?

从联邦医疗保险优势计划(Medicare Advantage)转回传统的联邦医疗保险(Original Medicare)可能会遇到一些麻烦和挑战,具体情况取决于个人的情况和时间节点。以下是一些需要考虑的因素:

  1. 时机:每年有特定的时间窗口可以进行转换,如每年的开放注册期(Open Enrollment Period)和特殊注册期(Special Enrollment Period)。开放注册期通常是每年的10月15日至12月7日,在此期间可以从 Medicare Advantage 转回传统 Medicare,并选择一个新的 Part D 处方药计划。
  2. MedigapMedicare Supplement Insurance:如果你希望购买 Medigap 计划来补充传统 Medicare 的覆盖,可能会遇到问题。Medigap 计划通常在首次加入 Medicare Part B 时有一次“保证发行”期(Guaranteed Issue Period),这意味着保险公司不能拒绝你或对已有的健康状况收费更高。如果你在其他时间段申请 Medigap 计划,保险公司可能会根据你的健康状况来决定是否接受你的申请以及收费情况。
  3. 覆盖差距:从 Medicare Advantage 转回传统 Medicare 后,可能会失去一些在 Medicare Advantage 计划中享有的额外福利,如牙科、视力、听力和健身会员等。需要确定是否可以接受这些差距,或寻找其他方式来获得类似的覆盖。
  4. 药物覆盖:如果你从 Medicare Advantage 计划(通常包括 Part D 处方药覆盖)转回传统 Medicare,你需要单独购买一个 Part D 计划以获得药物覆盖。确保在转换过程中没有药物覆盖的空窗期,以避免罚款。
  5. 医生和网络:Medicare Advantage 计划通常有自己的网络,回到传统 Medicare 后,你可以选择任何接受 Medicare 的医生和医院,这可能会影响你的医生选择和护理协调。

总之,从 Medicare Advantage 转回传统 Medicare 需要仔细规划和了解相关规定,以确保转换过程顺利,并能继续获得所需的医疗服务和覆盖。如果有疑问,可以咨询 Medicare 或寻求专业的保险代理人的帮助。