Bob Lin, MS-MVP, MCSE & CNE Data recovery, Windows OS Recovery, Networking, and Computer Troubleshooting on http://www.ChicagoTech.net How to Install and Configure Windows, VMware, Virtualization and Cisco on http://www.HowToNetworking.com
Bob Lin, MS-MVP, MCSE & CNE Data recovery, Windows OS Recovery, Networking, and Computer Troubleshooting on http://www.ChicagoTech.net How to Install and Configure Windows, VMware, Virtualization and Cisco on http://www.HowToNetworking.com
Bob Lin, MS-MVP, MCSE & CNE Data recovery, Windows OS Recovery, Networking, and Computer Troubleshooting on http://www.ChicagoTech.net How to Install and Configure Windows, VMware, Virtualization and Cisco on http://www.HowToNetworking.com
Clean Google FI cache. To do that, go to Google Fi>Storage.
Upgrade or re-install Google Fi.
Restart the phone.
Bob Lin, MS-MVP, MCSE & CNE Data recovery, Windows OS Recovery, Networking, and Computer Troubleshooting on http://www.ChicagoTech.net How to Install and Configure Windows, VMware, Virtualization and Cisco on http://www.HowToNetworking.com
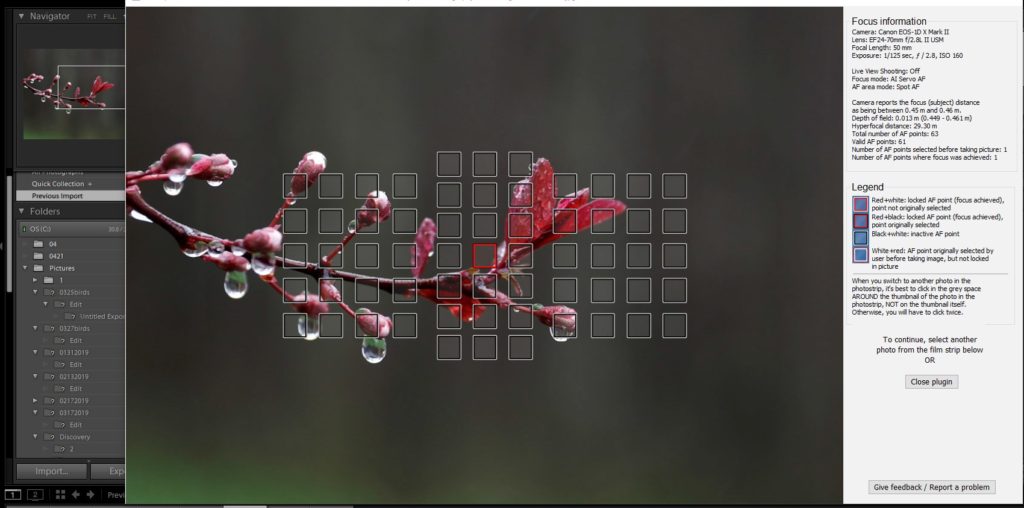
Make sure you are in the Library Module of Lightroom.
Select any photo from your catalog made with any Canon or Nikon DSLR camera. Make sure you select a photo (RAW, JPG, DNG) which comes directly out of the camera and has not been exported/saved in another format (photo which have changed Develop settings in Lightroom are OK), as that will often destroy the focus information metadata.
Now, start the plugin by going to the „Library“ Menu. Select the last menu entry, „Plug-In Extras“, and there „Show Focus Points“. Important: Note that you need to use the submenu “Plug-In Extras” in the “Library” menu, not the submenu “Plug-In Extras” in the “File” menu. The plugin dialog opens (as in the screenshots above). When you are finished with looking at the information for a particular image, you can select another photo from the photo strip below, or from another catalog directory. The plugin dialog will load and process the new photo (which takes a moment).
Bob Lin, MS-MVP, MCSE & CNE Data recovery, Windows OS Recovery, Networking, and Computer Troubleshooting on http://www.ChicagoTech.net How to Install and Configure Windows, VMware, Virtualization and Cisco on http://www.HowToNetworking.com
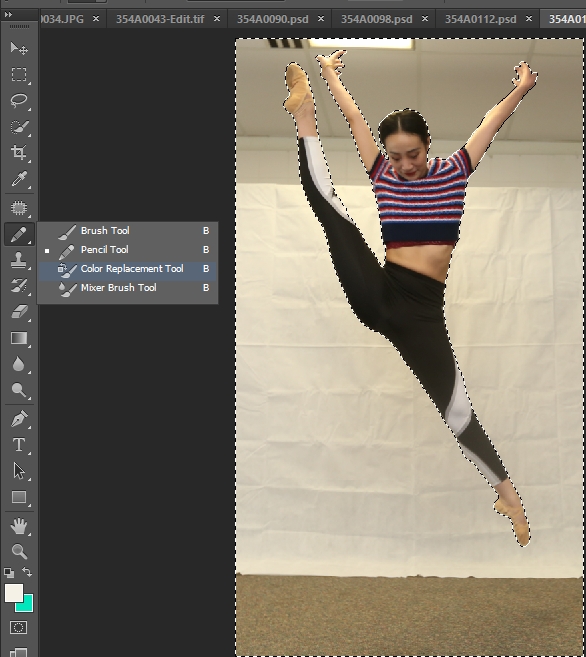
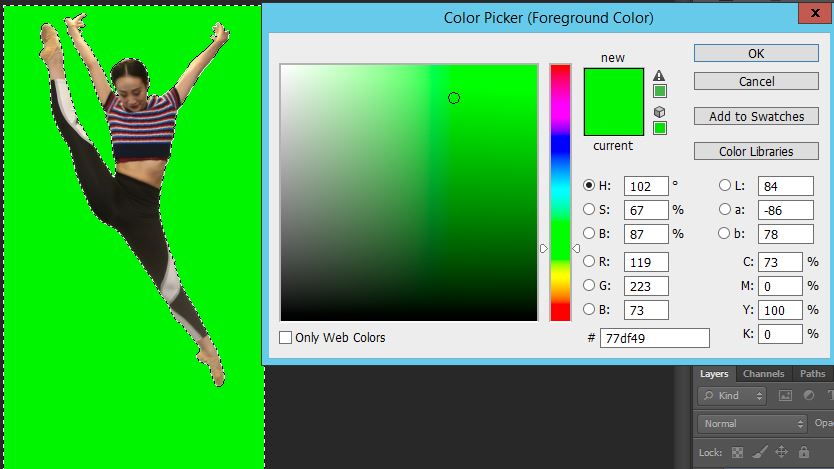
Use selection tool to select the area you want to be changed the color.
2. Choose Pencil tool.
3. Open Color Picker. Choose the color you would like to use and paint over the image. The color will replace the selected area color. The color doesn’t change the unselected area.
Bob Lin, MS-MVP, MCSE & CNE Data recovery, Windows OS Recovery, Networking, and Computer Troubleshooting on http://www.ChicagoTech.net How to Install and Configure Windows, VMware, Virtualization and Cisco on http://www.HowToNetworking.com
There are eight focus area selections in Sony A7R.
Wide: the whole screen is active, so the subject can be anywhere. The camera determines focus by picking the object that is either closest to the camera, in the center of the frame, or a face if there is one resent. Focuses automatically on a subject in all ranges of the image. When you press the shutter button halfway down in still image shooting mode, a green frame is displayed around the area that is in focus. Wide could be used in situations where your subject is by itself like portraits of one person or product photography. It is not recommend to use for multiple subjects or objects in the frame.
Zone: With Zone area selected, you can now select a large chunk of the frame to focus on, but the camera will still help select focus in that area. There are 9 different areas or zones, so you can have more control over where to focus. The Zone is good because you don’t have to move the spot around a lot, but it’s bad in that you still don’t have complete control.
Center: The Center Focus Area leaves the focus point in the middle of the frame, and that’s about it. You just have to put your subject matter in the center, and you will get it in focus.
Flexible Spot: you have a dot or square that you move around the screen and put on your focus point. With Flexible Spot, you control exactly where the focus goes.
Expand Flexible Spot: takes Flexible Spot M, but it allows the camera to try to help. When you’ve got your focus point on your subject, the Expand Flexible Spot will “expand” if needed outside of the focus point to grab focus.
Lock-On AF Expand Flexible Spot: This focus area takes Expand flexible spot, but then it will lock-on and follow the subject once you have started focusing. It could be used for tracing birds and sport objects.
It does what Lock-On AF Expand Flexible Spot does but in a different way. The first big difference is you have to activate this every time. You have to turn it on, put the subject in the center of the frame, and then select it. This makes it more involved than Lock-On AF Expand Flexible Spot. The other big difference is the way it works. Once you choose the subject, you don’t have to hold down the focus button. The camera just keeps following that subject.
Eye AF Eye AF goes even further into autofocus and face detection and will automatically find a subject’s eye, focus on it, and follow it!
To select focus area, go to MENU → (Camera Settings) → [Focus Area] → desired setting. Or press Fn.
Bob Lin, MS-MVP, MCSE & CNE Data recovery, Windows OS Recovery, Networking, and Computer Troubleshooting on http://www.ChicagoTech.net How to Install and Configure Windows, VMware, Virtualization and Cisco on http://www.HowToNetworking.com
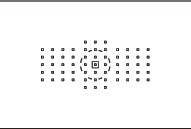
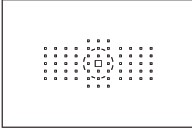
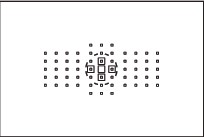
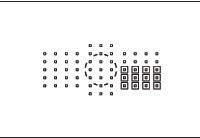
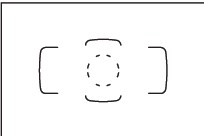
Single-Point Spot AF (manual selection) for pingpoint focusing.
2. Single-point AF (manual selection) for one point focusing.
3. AF point expansion (Manual selection) for using 4 surrounding AF points to focus.
4. AF point expansion (Manual selection) for 8 surrounding AF points to focus.
5. Zone AF (manual selection of zone) for 12 surrounding AF points to focus. The 61 AF points are divided into none zone for focusing.
6. 61-point automatic selection AF. This is the default settings and all the AF points are used to focus.
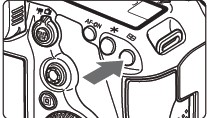
To select the AF Area mode,
Press the AF Area mode button.
2. Look through the viewfinder and press the M-Fn button to switch the AF area selection mode.
To select the AF Point manually,
Press the AF area mode button.
Move the points by pressing Multi-controller button or Main Dial or Quick Control Dial.
Bob Lin, MS-MVP, MCSE & CNE Data recovery, Windows OS Recovery, Networking, and Computer Troubleshooting on http://www.ChicagoTech.net How to Install and Configure Windows, VMware, Virtualization and Cisco on http://www.HowToNetworking.com
Q: After travel back to home in airport, my Moto X4 doesn’t have signal. If I enable Roaming, I might make phone call, but the quality is bad. In the home, I have the same problem and can’t access the internet and make phone call. I have turn the phone off and on. I also take the SIM card out and reset it, but all tries don’t fix the problem. What could be the problem?
chicagotech.net:
• Please dial the code same as ##344636## from dialer pad on the phone. It shows the current network information. It may be either T-Mobile or Sprint. • When the current network shows Sprint, then dial ##34866##, it switches to T-Mobile. • When the current network shows T-Mobile, then dial ##34777##, it switches to Sprint.
Bob Lin, MS-MVP, MCSE & CNE Data recovery, Windows OS Recovery, Networking, and Computer Troubleshooting on http://www.ChicagoTech.net How to Install and Configure Windows, VMware, Virtualization and Cisco on http://www.HowToNetworking.com