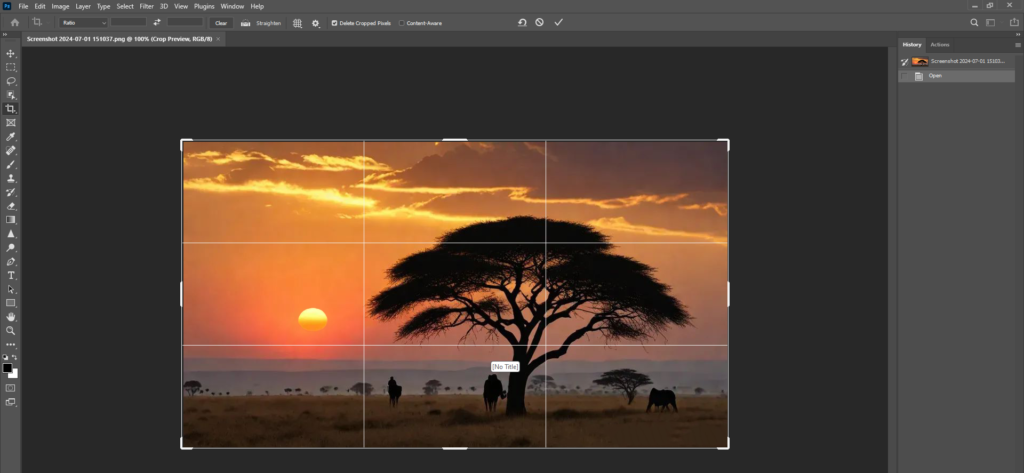
如何拍摄烟花

拍摄烟花既好玩有趣,只要掌握好一下几个要点就能帮助你拍摄出精彩烟花照片。

所需设备

  1. 相机:单反相机或无反相机是理想选择,但高质量的智能手机也可以使用。
  2. 三脚架:长时间曝光时保持相机稳定是必要的。
  3. 遥控快门释放:触发快门时有助于减少相机抖动。
  4. 镜头:通常建议使用具有手动对焦功能和24mm至70mm焦距的镜头。

相机设置

  1. 手动模式:这样你可以完全控制设置。
  2. ISO:从低ISO 100开始,避免噪点,ISO 400也可以。
  3. 光圈:使用中等光圈,如f/8,以确保清晰度。
  4. 快门速度:设置长时间曝光,起始值大约为2-4秒,以捕捉光的轨迹。根据烟花的亮度进行调整。

对焦

  1. 手动对焦:将焦距设置为无穷远(通常在镜头上标有∞符号),因为自动对焦在低光环境中可能会有困难。

构图

  1. 勘察地点:找一个可以清晰看到烟花发射的地方。
  2. 构图:考虑包括一些前景元素,如建筑物或人的剪影,以增加深度。

拍摄技巧

  1. 使用B门模式:这使你可以用遥控快门释放手动控制曝光。
  2. 时机:预测烟花爆发的时刻,并调整曝光时间以捕捉每次烟花的完整绽放。
  3. 尝试:拍摄多张不同曝光的照片,以确保捕捉到最佳时刻。

后期处理

  1. 回顾:定期检查你的照片,如有必要,调整设置。
  2. 编辑:使用如Adobe Lightroom等软件,拉黑暗部,微调亮度,颜色、对比度和清晰度。

额外提示

  1. 提前到达:提前占据一个好位置,并在天黑前设置好设备。
  2. 保持耐心:可能需要几次尝试才能拍到完美的照片,所以不要灰心。

Optimizing the Sony A1 for Sports and Action Photography: Step-by-Step Guide

1. Camera Settings

  • Mode Dial: Set the mode dial to Manual (M) for full control. Turn the mode dial to M while pressing the mode dial lock release button in the center of the mode dial
  • or Shutter Priority (S) to prioritize fast shutter speeds.
  • Shutter Speed: Set a high shutter speed, typically between 1/1000 and 1/4000 seconds, to freeze fast-moving subjects.

Select the desired shutter speed by turning the rear dial.

  • Aperture: Use a wide aperture (e.g., f/2.8 or f/1.4) to let in more light and create a shallow depth of field, isolating your subject from the background.

Select the desired aperture value by turning the front dial.

  • ISO: Set ISO to Auto but with a maximum limit (e.g., 3200) to ensure the camera can handle varying light conditions without introducing too much noise.
Select the desired ISO value by turning the Control Wheel.

Or press Function key.

2. Autofocus Settings

  • Focus Mode: Set to Continuous AF (AF-C) to maintain focus on moving subjects. Turn the focus mode dial to AF-C while pressing the focus mode dial lock release button.
  • Focus Area: Use Wide or Zone focus areas for broader coverage or Flexible Spot for precise focus points. Go to MENU → (Focus) → [Focus Area] → [ Focus Area Limit] → Add check marks to the focus areas that you want to use, and then select [OK].

Or press Function key.

Or press C2

Then, Select the desired Focus Area.

  • Tracking: Enable Real-time Tracking and Real-time Eye AF for enhanced subject tracking and focus accuracy.

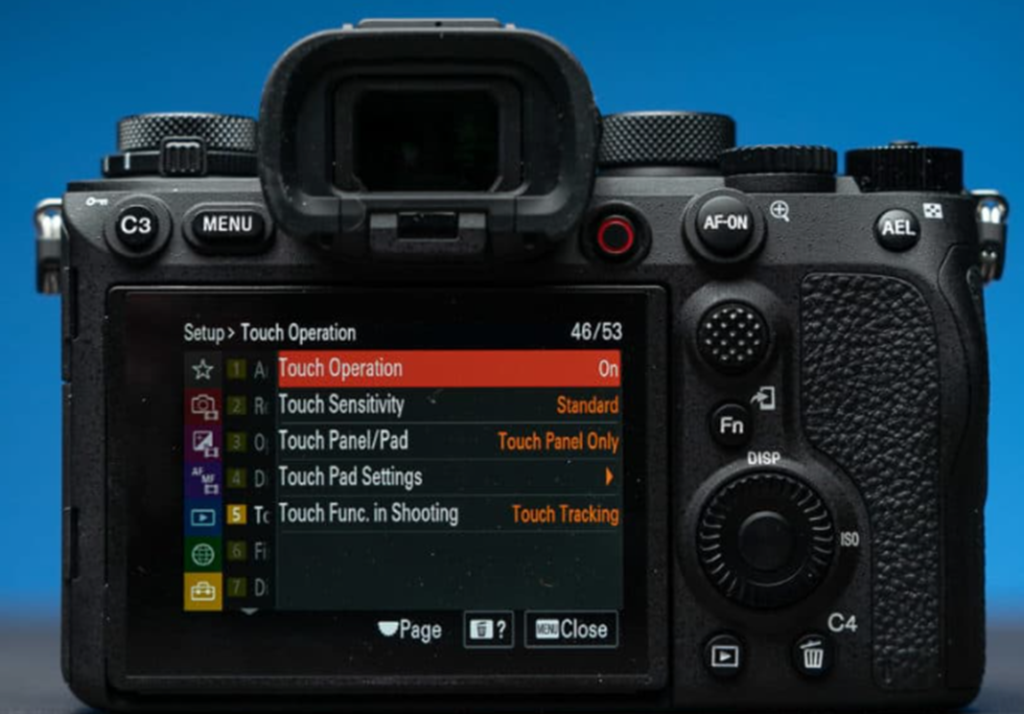
Go to menu > Setup > Touch Operation, turn it on.

Aso, MENU → (Setup) → [Touch Operation] → [Touch Func. in Shooting] → [Touch Tracking].

You can also use the touch pad to select a subject for tracking when shooting with the viewfinder.

3. Drive Mode

  • Continuous Shooting: Set the drive mode to Hi+ (up to 30 frames per second) for maximum burst shooting. This ensures you capture every moment of the action.

4. Custom Buttons and Functions

  • Custom Buttons: Assign frequently used settings like Focus Area, Drive Mode, and ISO to custom buttons for quick access.

  • Back-Button Focus: Enable back-button focus to separate focusing from the shutter button, providing more control over focus during fast action.

5. Image Quality Settings

  • File Format: Use RAW for maximum flexibility in post-processing or RAW + JPEG if you need immediate JPEGs.

  • White Balance: Set to Auto or customize based on the lighting conditions.

6. Stabilization and Lens Choice

  • Image Stabilization: Enable in-body image stabilization (IBIS) to reduce camera shake, especially when panning. Go Menu > Shooting > Image Stabilization.

  • Lens: Use a fast, telephoto lens with a wide maximum aperture (e.g., 70-200mm f/2.8) for capturing distant action with good light-gathering capability.

7. Monitoring and Reviewing

  • EVF and LCD: Use the electronic viewfinder (EVF) for real-time feedback and the LCD screen for quick review of images.

  • Histogram and Exposure: Monitor the histogram to ensure proper exposure, avoiding blown highlights or underexposed areas.

8. Battery and Memory Management

  • Extra Batteries: Carry extra batteries as continuous shooting and high-speed operations can drain the battery quickly.

  • High-Speed Memory Cards: Use fast memory cards (UHS-II) to handle the high data rate of continuous shooting.

9. Practice and Experimentation

  • Familiarity: Practice with your camera settings in different sports scenarios to become familiar with the best settings for various conditions.
  • Experiment: Don’t be afraid to experiment with different settings to see what works best for the specific action you are capturing.

10. Post-Processing

  • Software: Use software like Adobe Lightroom or Capture One to process RAW files, adjusting exposure, sharpness, and noise reduction.

How to add picture-in-picture using Clipchamp

To add a picture into another picture using Clipchamp, you can create a picture-in-picture effect. Here’s how:

1.            Import Your Media:

Open your project in Clipchamp.

Import the main video and the second video that you want to use as the background.

2.            Add the Overlay:

Click and hold the main video, move it to the timeline,

It should turn green.

Click and hold the second video above the main video on timeline.

Click the second video.

It should turn green.

Move the second video to the location you want.

You can also adjust the second video size.

Alternatively, click on the second video,

Click on three dots at the top.

Choose the “picture-in-picture” option.

Select the desired position

Options are top left, top right, bottom left, or bottom right for your overlay.

Drag and adjust the overlay to position it within the video preview.

3.            Preview and Save:

Preview your project to ensure the overlay looks as desired.

Make any additional adjustments if needed.

Save your video with the added picture-in-picture effect.

How to use the Tesla touchscreen to quickly control features

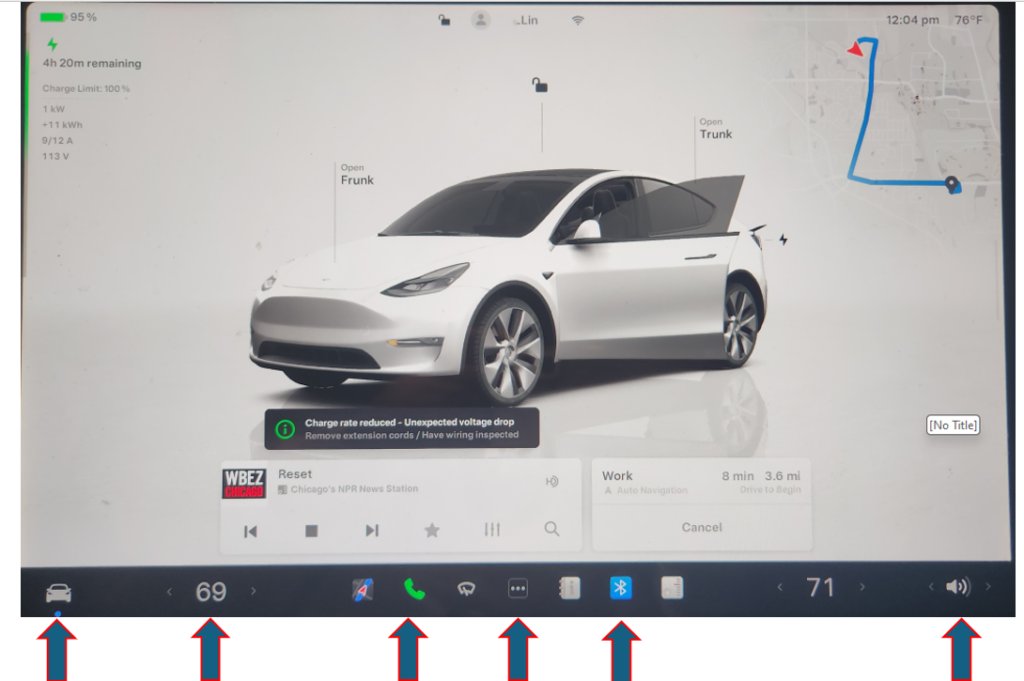
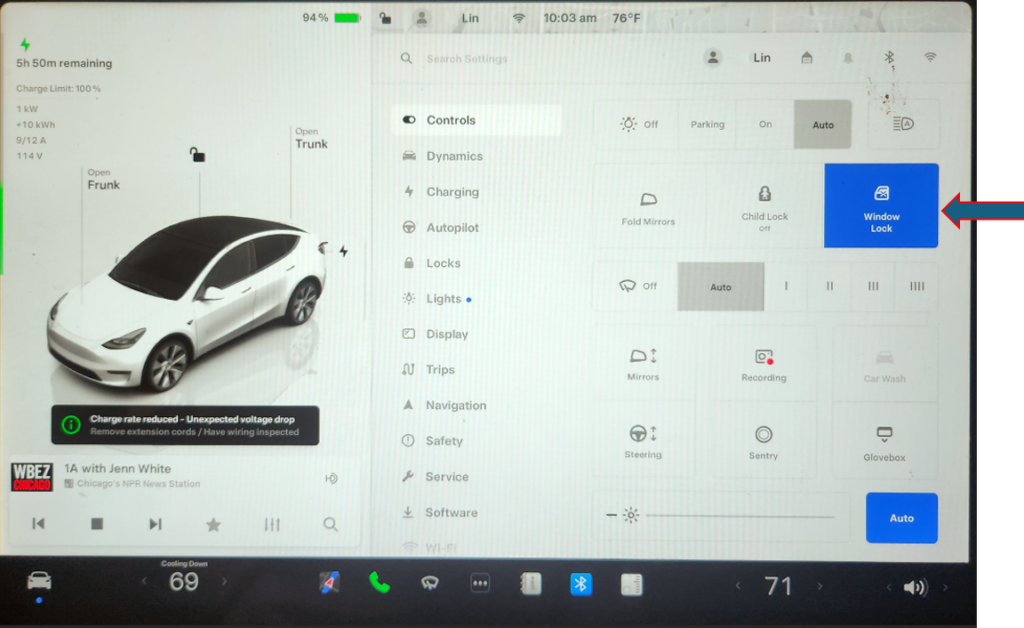
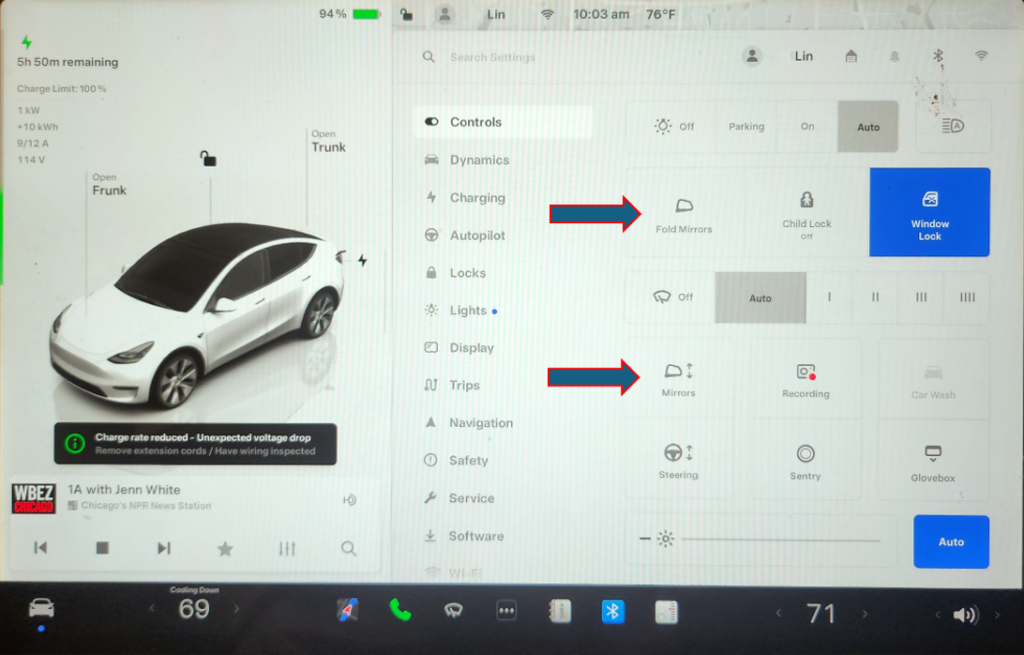
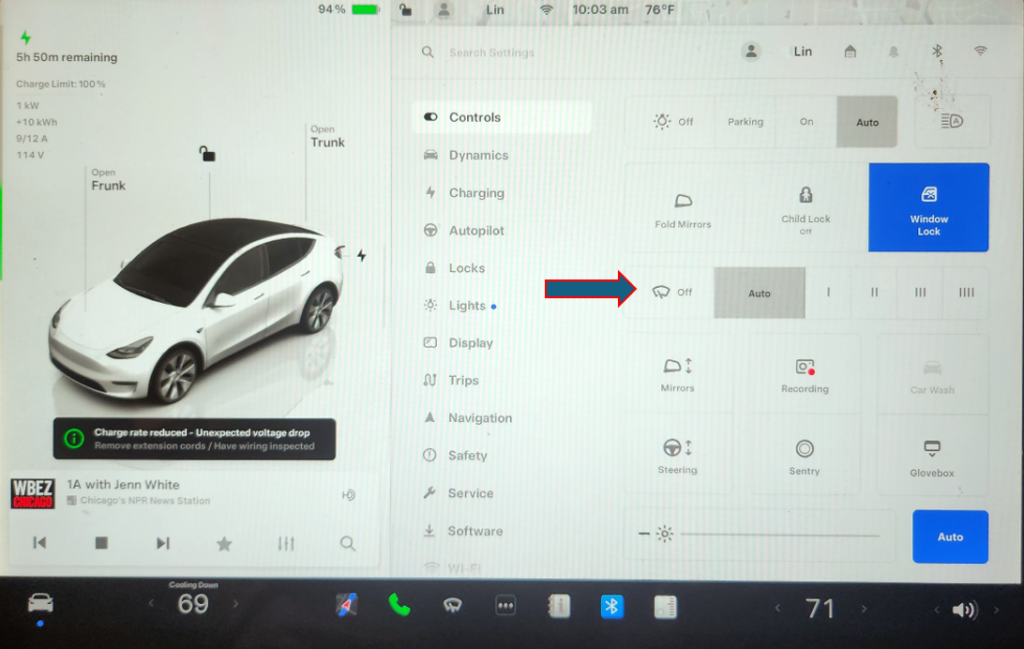
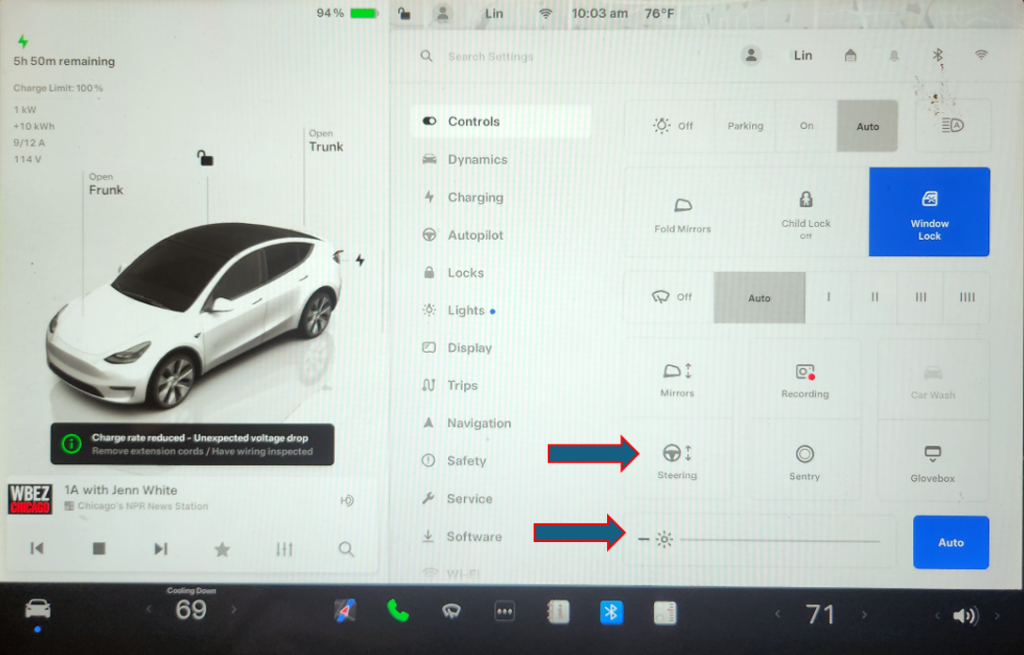
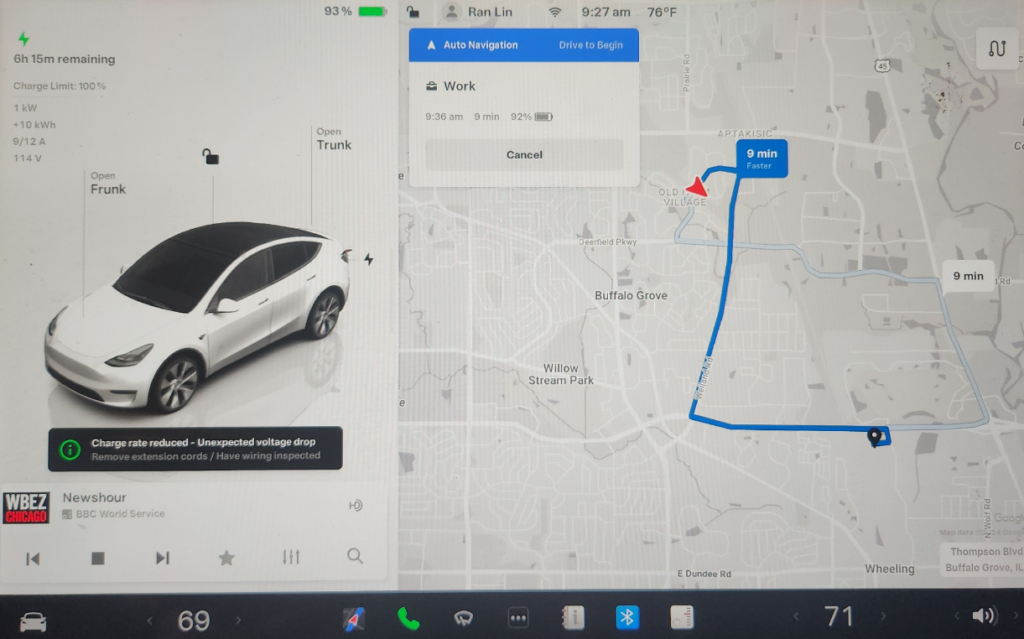
Accessing Tesla features is easy if you know where those icons are on the touchscreen. Here is a summary of how to use the Tesla touchscreen to quickly control features:

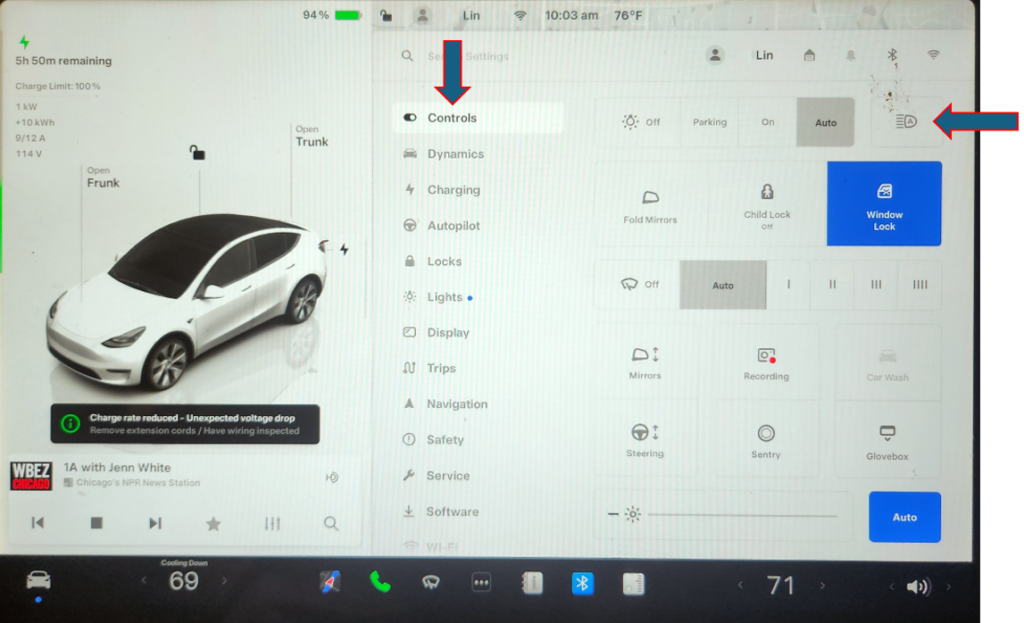
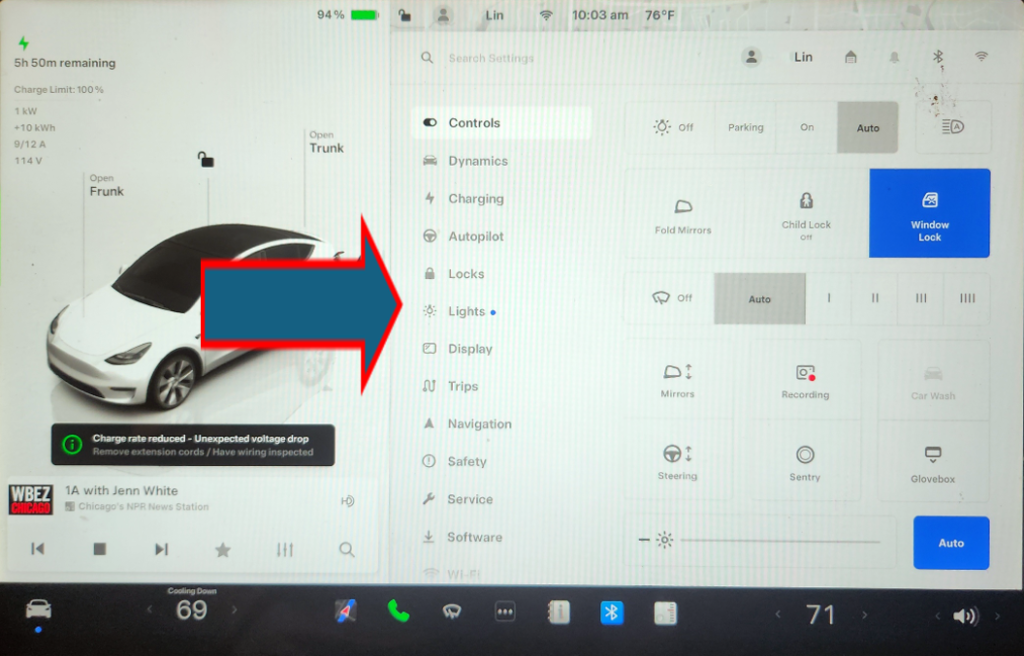
Tap the Car icon to access vehicle settings.

In the Quick Controls, you can adjust lights,

adjust locks

Adjust mirrors

Adjust Wipers

Adjust Steering, Screen bright and more…

From this menu, you can access Driving, Autopilot, Safety and other settings.

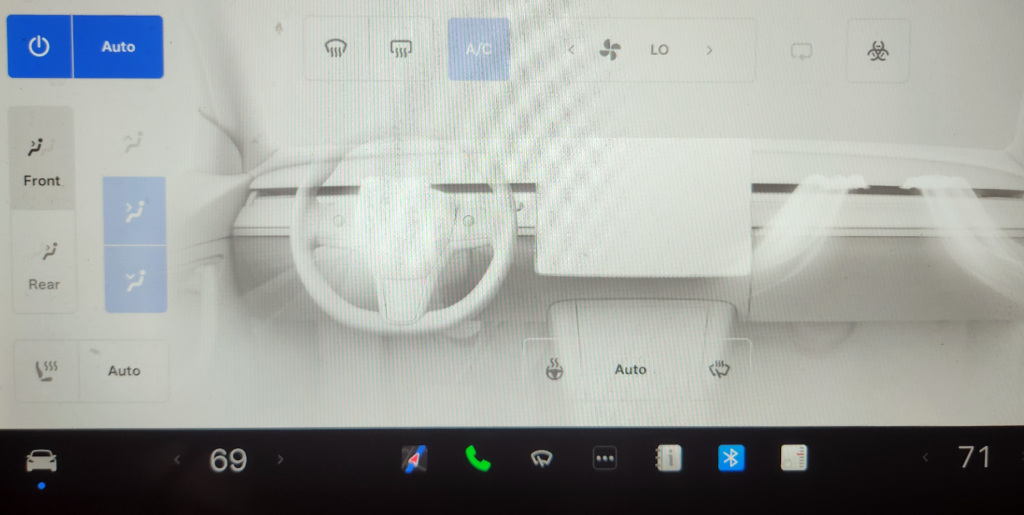
In the Climate icon,

adjust the temperature by sliding the temperature bar to left or right.

Tap the Climate icon to access temperature settings.

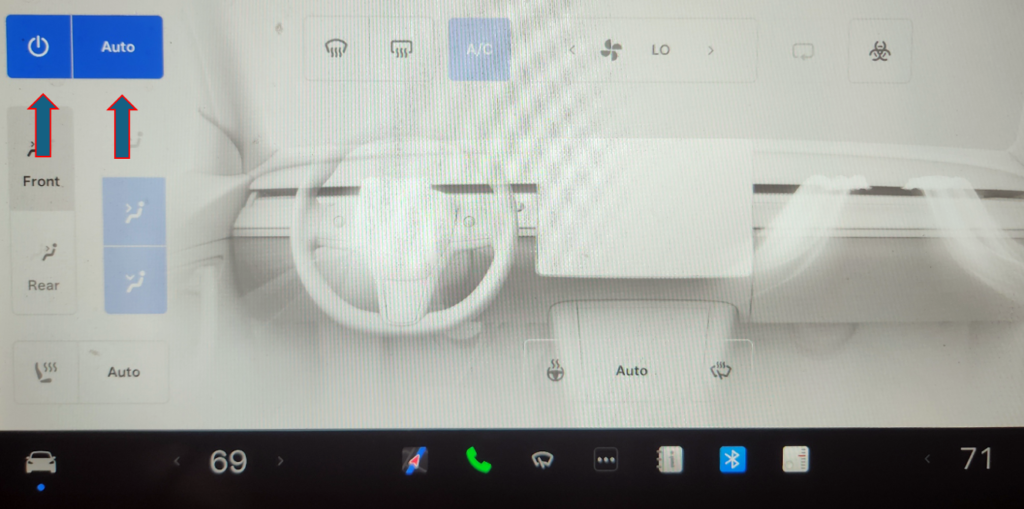
With temperature settings, you can turn the Climate control on or off.

adjust the climate settings for the front or Rear cabin

Choose where air flows into the front cabin, windshield, face-level, or foot-level vents. You can choose one or more vents.

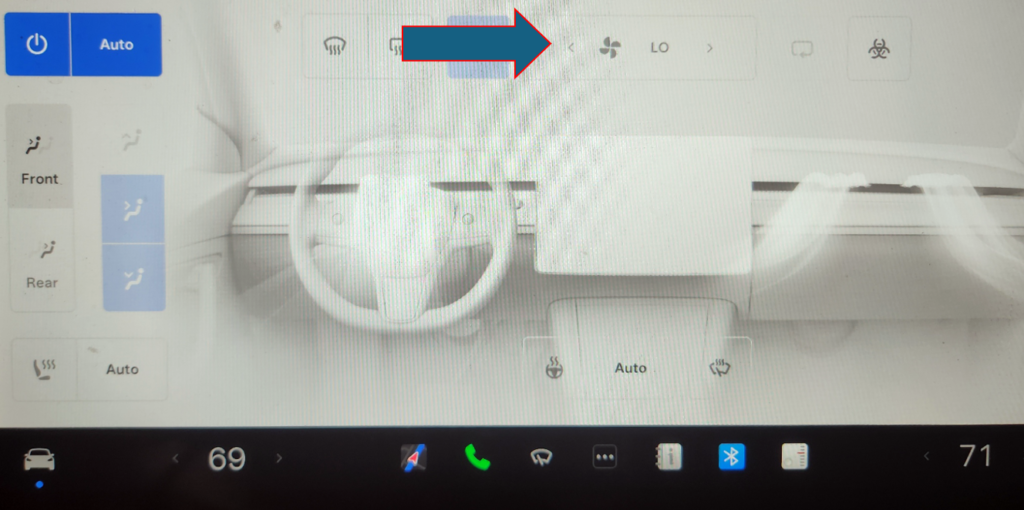
Adjust the fan speed and direction controls to customize airflow.

and more…

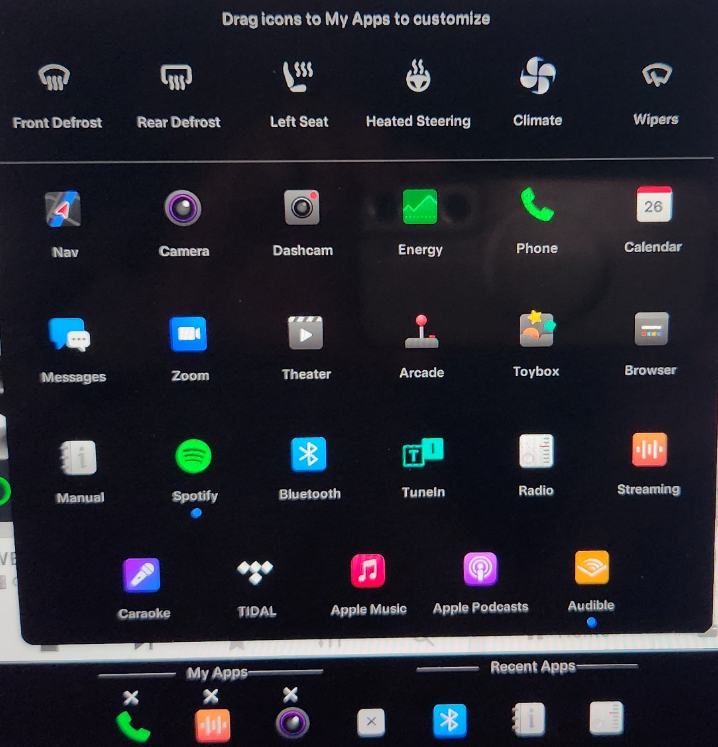
Tap My Apps: For one-touch access to frequently used apps and controls,

For example, Tap the Navigation icon

to enter a destination

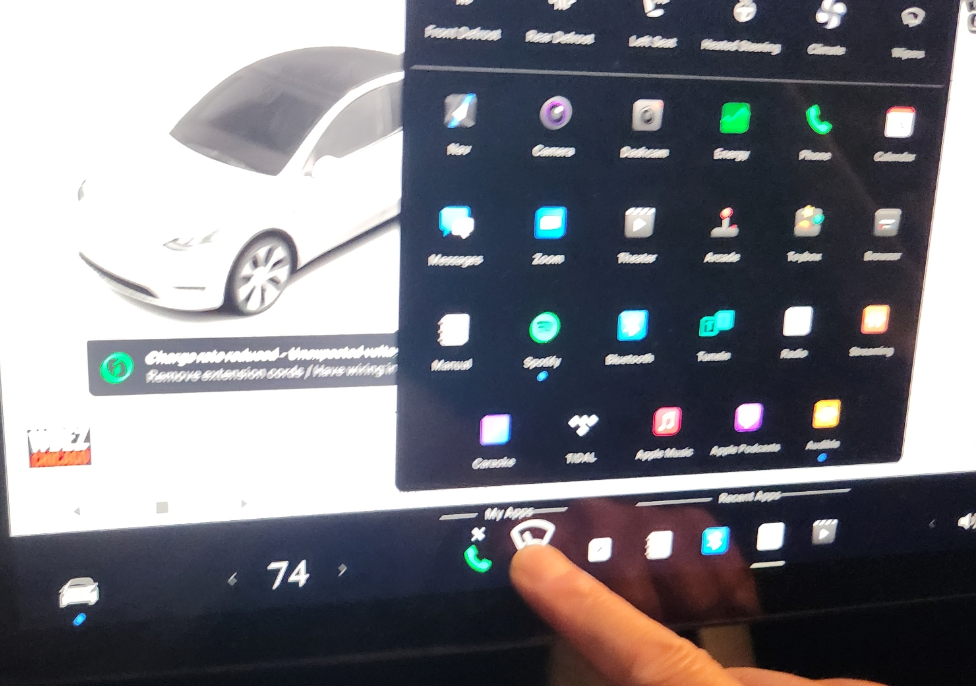
You can choose what displays in My Apps by tapping App Launcher.

With the app tray open, touch any app you want to add it to My Apps.

Hols and move it to the My Apps area.

The app you choose displays on top of My Apps.

Tap Recent Apps to Displays the most recently used app(s).

Note: The number of recent apps displayed here depends on how many apps have been added to My Apps. If you add the maximum number of apps to My Apps, only the most recent app displays.

Tap Audio Volume icon

to adjust the volume by sliding the volume bar to left or right.

How to add an app to your Tesla

Adding an app to your Tesla touchscreen for quick access to a feature is simple and quick. Here’s how you can do it:

  1. Open the Tesla Touchscreen: Start by tapping the screen to wake it up if it’s not already on.
  2. Access the Application Launcher: Tap the application launcher icon at the bottom of the screen. This will open the app menu.
  3. Browse Available Apps: Scroll through the available apps. Tesla’s app store includes a variety of options, from media players to productivity tools.
  4. Select and Install an App: Tap on the app you want to install. A detailed page will open, providing more information about the app. Tap ‘Install’ to add the app to your Tesla.
  5. Access Your New App: Once installed, you can find your new app in the app launcher menu. Simply tap to open and start using it.

Pro Tips:

  • Keep Your Tesla Updated: Ensure your Tesla’s software is up-to-date to access the latest apps and features.
  • Customize Your Home Screen: Arrange your apps on the home screen for quick access to your favorites.

By following these steps, you can easily enhance your Tesla experience with new apps.

Tesla Autopilot features are temporarily unavailable

If you see the alert APP_w048 on your Tesla, it means Autopilot features are temporarily unavailable. These features may include Autosteer, Traffic-Aware Cruise Control, Automatic Emergency Braking, Forward Collision Warning, and Lane Departure Warning.

What this alert means:

Autopilot features are currently unavailable on your vehicle. Typically, Autopilot features are restored on your next drive. However, this alert can be triggered for several reasons, including software updates or sensor issues.

What to do:

Check for additional alerts that indicate the cause of this condition. Usually, Autopilot features will be restored on your next drive. If the alert persists across multiple drives, schedule service at your earliest convenience.

Mastering Tesla Climate Control Easy Guide!

Adjusting the climate control settings in your Tesla is simple and efficient. Here’s how you can make your ride more comfortable.

Temperature Adjustment

To adjust the temperature, use the touchscreen on the center console. Tap the temperature control icon and slide to set your desired temperature. You can sync the temperature for both driver and passenger or set them individually for personalized comfort.

Seat Heating

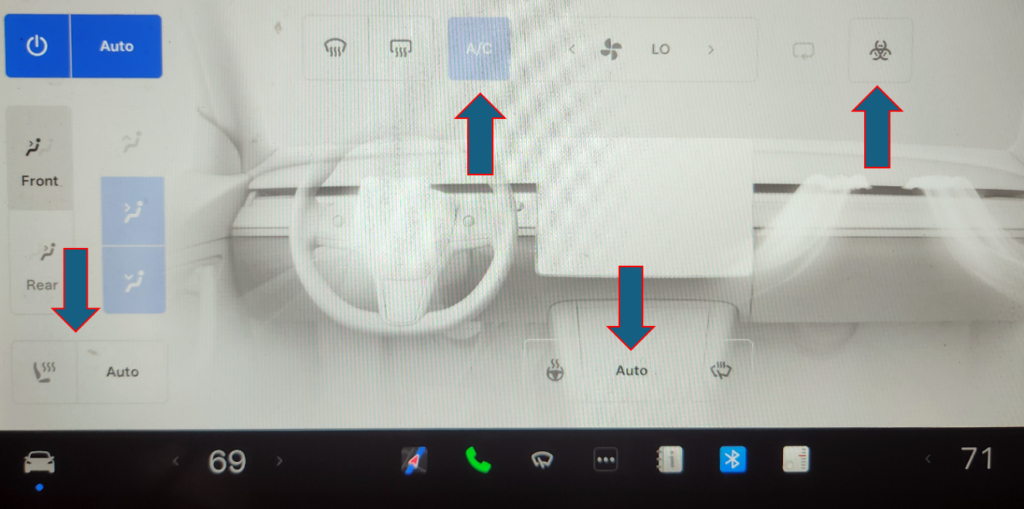
For those chilly days, activate the seat heaters by tapping the seat icon on the climate control screen. You can adjust the heat level to low, medium, or high for both front and rear seats.

Defrosting

To quickly defrost your windows, tap the defrost icon. This will activate both the front and rear defrosters, ensuring clear visibility in no time.

Optimal Use Tips

  • For efficient climate control, pre-condition your car using the Tesla app before you start driving. This helps save battery life and keeps your car comfortable.
  • In hot weather, set the temperature a few degrees lower and use the “Vent” mode to let out hot air before getting in.
  • In cold weather, use seat heaters instead of cranking up the cabin temperature to save energy.

CC_a004Unable to charge – Wall Connector issueWall Connector needs service

What this alert means:

Wall Connector hardware issue. Possible issues include:

  1. Contactor not working
  2. Self-test of internal ground fault monitoring circuit failed
  3. Thermal sensor disconnected
  4. Other hardware component issues

What to do:

An internal issue was detected by the Wall Connector.

  1. Try charging again by disconnecting the Wall Connector from the vehicle and reconnecting.
  2. If the issue persists, turn OFF the circuit breaker for the Wall Connector, wait 10 seconds, and turn the circuit breaker ON again. Then try reconnecting the Wall Connector to the vehicle.
  3. If the issue persists, have an electrician make sure all wires are properly connected and torqued according to the instructions in the Wall Connector Installation Manual.
  4. Once your electrician has completed all work and restored power to the Wall Connector, try charging again by reconnecting the Wall Connector to the vehicle.
  5. If the issue persists, the Wall Connector requires service.

APP_w224Cruise control unavailableContinue driving to allow cameras to calibrate

What this alert means:

Traffic-Aware Cruise Control and Autosteer are unavailable because the cameras on your vehicle are not fully calibrated.

Your vehicle must maneuver with great precision when features like Traffic-Aware Cruise Control and Autosteer are active. Before these features can be used for the first time, the cameras must complete an initial self-calibration. Occasionally, one or more cameras can become uncalibrated.

What to do:

Continue to your destination. Your vehicle is OK to drive.

Traffic-Aware Cruise Control and Autosteer will remain unavailable until camera calibration is complete.

When calibration is complete, Traffic-Aware Cruise Control and Autosteer should be available.

For your convenience, a calibration progress indicator is displayed on the touchscreen. Calibration typically completes after your vehicle has driven 20-25 miles (32-40 km), but the distance varies depending on road and environmental conditions. For example, driving on a straight road with highly visible lane markings helps the cameras calibrate quicker.

If the alert persists and camera calibration has not completed after your vehicle has driven 100 miles (160 km) or more, or Traffic-Aware Cruise Control and Autosteer remain unavailable despite successful camera calibration, schedule service at your earliest convenience. Your vehicle is OK to drive in the meantime.

APP_w222Cruise control unavailableReduced front camera visibility

What this alert means:

Traffic-Aware Cruise Control and Autosteer are unavailable because one or more of the front cameras in your vehicle is blocked or blinded by external conditions.

Traffic-Aware Cruise Control and Autosteer will remain unavailable while a front camera lacks adequate visibility. Cameras may have limited or no visibility due to:

  • Dirt or debris on the camera surface.
  • Environmental conditions like rain, fog, snow, or dew.
  • Bright sunlight or glare from another light source.
  • Low or limited light conditions, including unlit or poorly lit roadways at night.
  • Condensation (water droplets or mist) on the camera surface.
  • Monotonous environmental features, including tunnel walls or highway dividers.

What to do:

Continue to your destination. Your vehicle is OK to drive.

This is often a temporary issue that clears up on its own. If the alert does not clear by the end of your drive:

  • Inspect and clean the front camera area at the top center of the windshield before your next planned drive.
  • Check the camera surface for condensation, dirt, or other debris and attempt to clear any obstruction.

See Cleaning a Camera for more information on clearing dirt or debris from that area of the vehicle.

Although condensation on the inside of the front camera enclosure cannot be wiped clean, you can usually clear it quicker by following these steps:

  1. Pre-condition the cabin with the temperature set to High and A/C turned ON.
  2. Turn on the front windshield defroster.

If this alert persists throughout subsequent drives but no front camera obstruction is visible, schedule service at your earliest convenience. Your vehicle is OK to drive in the meantime.